I have spent a frustrating 8 months with buggy software in my Nokia n80. My biggest problem is that sometimes the phone's power management would flatten the battery in 2hours while supposedly on standby!
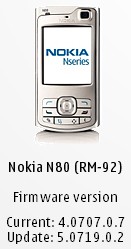
For some months the Nokia Software Update program was telling me there was new firmware but would crash any time I tried to download it. The for the last 5 months it told me my software actually was up to date. So here I was stuck with version 4.0707.0.7 when the Nokia forums were telling me there was new software.
Some background... 12 months ago I reflashed my Nokia n80 with n80i firmware and replaced the original device code (00539815) with one of the n80i Australian codes 0540864 (AUSTRALIA Smooth Stainless Internet Edition). Today I contemplated the fact that all real n80i's I had seen were black. So I reprogrammed the device code with 0540843 (AUSTRALIA Pearl Black Internet Edition) and tried again.... SUCCESS!!!
I am now the proud owner of a nokia n80 pretending to be a nokia n80i with software version 5.019.0.2. Time to re-install all my widgets into it again!
For those wanting to tinker, the tool used reflash the device ID can be found at http://rapidshare.com/files/5911866/nss10383.rar
1. Install NSS and run
2. Plug in phone and select "pc suite" on phone
3. In NSS click "scan for new devices"
4. Click phone info
5. Click enable product code and enter 0540843 (this is for AUSTRALIA Pearl Black)
6. Click "write"
7. When complete unplug phone and exit NSS
8. Uninstall NSS
More information including device codes for other regions and countries can be found at http://www.allaboutsymbian.com
Happy tinkering! ( at your own risk with no responsibility accepted by me! )
... Robert
Tuesday, January 15. 2008
TomTom Console
Well now I have played enough to know that there is plently more tinkering to be done with my TomTom.
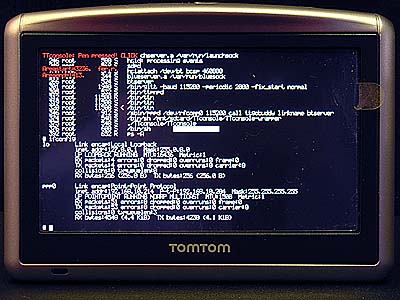
Here is the TomTom console in action:
# ifconfig' shows I have created an IP connection (ppp0) via bluetooth DUN.
There is even a neat little touch keyboard which you can pop-up and hide for typing. The tinkering is endless from here on so time to configure a suitbale toolchain!
You can find the TomTom console at http://www.opentom.org/TomTom_Console
Monday, January 14. 2008
Linux Hosted Bluetooth IP Connection For TomTom
The following instructions are not meant to be a 'how to' but a 'how I did' and is based on Arjan van de Ven's website http://www.fenrus.org/tomtom/ I have added a couple extra steps including modifying rfcomm.conf, registering the DUN service and specifying the bluetooth channel for DUN.
These notes assume you have bluetooth already present and operational as was the case with my Ubuntu 7.10 system.
Install bluetooth support and confirm you can see your Bluetooth device.
# hcitool dev
Devices:
hci0 00:02:5B:01:0D:CB
Confirm you can see your TomTom
# hcitool scan
Scanning ...
00:13:6C:9C:A0:5A TomTom ONE XL
Change your bluetooth device's class to report itself as a mobile phone offering Telephony services and confirm settings.
# hciconfig hci0 class 0x500204 (I borrowed this class from my Nokia phone)
# hciconfig hci0 class
hci0: Type: USB
BD Address: 00:02:5B:01:0D:CB ACL MTU: 384:8 SCO MTU: 64:8
Class: 0x500204
Service Classes: Telephony
Device Class: Phone, Cellular
To have the device class retained as the default HCI configuration edit the file '/etc/bluetooth/hcid.conf'
Write this file into '/etc/ppp/tomtom.sh' and ensure it has execute permissions.
#!/bin/sh
/usr/sbin/chat -e -f /etc/ppp/tomtom.chat
Write this file into '/etc/ppp/peers/tomtom'
noauth # Don't require authentication
local # This is needed because it's not a real serial line
noipdefault # Don't use the local hostname to determine the local IP used
proxyarp # Proxy ARP connections
nodefaultroute # Don't use the default route
noipx # Don't use the IPX protocol
idle 0 # Set an unlimited disconnect timeout
# Change the next three lines for your setup
#:
#The first ip needs to be your computer, the second ip needs to be a non-used ip in your network
192.168.10.204:192.168.10.214
# ms-dns
# this needs to be a real dns server, look in /etc/resolv.conf
ms-dns 192.231.203.132
# netmask
netmask 255.255.255.0
Write this file into '/etc/ppp/tomtom.chat'
ATZ OK
ATD CONNECT
Write/Edit the file '/etc/bluetooth/rfcomm.conf'
#
# RFCOMM configuration file.
#
rfcomm0 {
# Automatically bind the device at startup
bind no;
# Bluetooth address of the device
# This is the address of my TomTom, put your own here!
device 00:13:6C:9C:A0:5A;
# RFCOMM channel for the connection
# This is appears to be the channel used for DUN
channel 2;
# Description of the connection
comment "Example Bluetooth device";
}
Start the Dial-Up Networking daemon. I found I needed to add the channel option.
# dund --dialup --listen --channel 2 call tomtom connect /etc/ppp/tomtom.sh
Register Dial-Up Networking service with bluetooth.
# sdptool add dun
Dial-Up Networking service registered
You can use '# sdptool records local' to see all local bluetooth services now registered.
You will need to add these commands to turn your PC into a router for the connection.
echo 1 > /proc/sys/net/ipv4/ip_forward
iptables -t nat -A POSTROUTING -o eth0 -j MASQUERADE
Now you are ready to connect with your TomTom, this is the tedious part as it has to be done manually.
Manage Phones -> Yes (search for phones) -> (select you linux machine) -> Continue -> Yes
Select your phone model: -> Other
Select your country: -> Other
Do you want to set up your wireless data connection manually? -> YES
Access point name: -> OK
Username: -> OK
Password: -> OK
Do you want to obtain your IP address automatically (DHCP) or do you want to set up your IP address manually? -> Automatic
Do you want to obtain your DNS server address automatically or do you want to set up your DNS server address manually? -> Automatic
Dial: -> OK
Login script: -> OK
Yes to all ensuing prompts and you are done!!!!
These notes assume you have bluetooth already present and operational as was the case with my Ubuntu 7.10 system.
Install bluetooth support and confirm you can see your Bluetooth device.
# hcitool dev
Devices:
hci0 00:02:5B:01:0D:CB
Confirm you can see your TomTom
# hcitool scan
Scanning ...
00:13:6C:9C:A0:5A TomTom ONE XL
Change your bluetooth device's class to report itself as a mobile phone offering Telephony services and confirm settings.
# hciconfig hci0 class 0x500204 (I borrowed this class from my Nokia phone)
# hciconfig hci0 class
hci0: Type: USB
BD Address: 00:02:5B:01:0D:CB ACL MTU: 384:8 SCO MTU: 64:8
Class: 0x500204
Service Classes: Telephony
Device Class: Phone, Cellular
To have the device class retained as the default HCI configuration edit the file '/etc/bluetooth/hcid.conf'
Write this file into '/etc/ppp/tomtom.sh' and ensure it has execute permissions.
#!/bin/sh
/usr/sbin/chat -e -f /etc/ppp/tomtom.chat
Write this file into '/etc/ppp/peers/tomtom'
noauth # Don't require authentication
local # This is needed because it's not a real serial line
noipdefault # Don't use the local hostname to determine the local IP used
proxyarp # Proxy ARP connections
nodefaultroute # Don't use the default route
noipx # Don't use the IPX protocol
idle 0 # Set an unlimited disconnect timeout
# Change the next three lines for your setup
#
#The first ip needs to be your computer, the second ip needs to be a non-used ip in your network
192.168.10.204:192.168.10.214
# ms-dns
# this needs to be a real dns server, look in /etc/resolv.conf
ms-dns 192.231.203.132
# netmask
netmask 255.255.255.0
Write this file into '/etc/ppp/tomtom.chat'
ATZ OK
ATD CONNECT
Write/Edit the file '/etc/bluetooth/rfcomm.conf'
#
# RFCOMM configuration file.
#
rfcomm0 {
# Automatically bind the device at startup
bind no;
# Bluetooth address of the device
# This is the address of my TomTom, put your own here!
device 00:13:6C:9C:A0:5A;
# RFCOMM channel for the connection
# This is appears to be the channel used for DUN
channel 2;
# Description of the connection
comment "Example Bluetooth device";
}
Start the Dial-Up Networking daemon. I found I needed to add the channel option.
# dund --dialup --listen --channel 2 call tomtom connect /etc/ppp/tomtom.sh
Register Dial-Up Networking service with bluetooth.
# sdptool add dun
Dial-Up Networking service registered
You can use '# sdptool records local' to see all local bluetooth services now registered.
You will need to add these commands to turn your PC into a router for the connection.
echo 1 > /proc/sys/net/ipv4/ip_forward
iptables -t nat -A POSTROUTING -o eth0 -j MASQUERADE
Now you are ready to connect with your TomTom, this is the tedious part as it has to be done manually.
Manage Phones -> Yes (search for phones) -> (select you linux machine) -> Continue -> Yes
Select your phone model: -> Other
Select your country: -> Other
Do you want to set up your wireless data connection manually? -> YES
Access point name: -> OK
Username: -> OK
Password: -> OK
Do you want to obtain your IP address automatically (DHCP) or do you want to set up your IP address manually? -> Automatic
Do you want to obtain your DNS server address automatically or do you want to set up your DNS server address manually? -> Automatic
Dial: -> OK
Login script: -> OK
Yes to all ensuing prompts and you are done!!!!
Sunday, January 13. 2008
Custom Splash Screen For TomTom One
Warning: I disclaim all responsibility for any damage incurred by you in reading this article. Modifications to your device must only be undertaken if you are sufficiently skilled and are at your risk. Always backup your device before making any changes.
Out of the box the TomTom signs on with the 'TomTom' splash screen and shuts down with the antitheft splash screen.
When you connect your TomTom to your PC it connects by mapping part of its internal or SD flash file system as a USB Fash Drive. You will find these splash files in the root of the mapped drive on your PC. Before making any changes you should make a complete backup of this mapped drive including all hidden and system files.
You can simply replace these files with files of your own. Files must be 480x272 Windows 24bit RGBs .BMP format (320x240 for TomTom One V3). Here's mine, feel free to download and enjoy.
For owners of TomTom One V3 the file names will be slightly different (splash.bmp & antitheft.bmp) however the mechanism remains the same. Also please note that if you use your device upside-down you will need to create upside-down images as the TomTom does not do this automatically.
Until next time, keep on tinkering! ...Robert
Welcome To My New TomTom Blog
As an avid enthusiast of technical gadgets this new addition to my life is likely to be both a blessing and a burden! You see I can't just use it, I need to play with it and that means in ways never intended.
I first purchased the TomTom One V3 thinking that it would suit my needs. I used it for a day and found it to be informative, accurate and a joy to use. I'd recommend it to virtually all my friends and family. It did suffer however one major disadvantage... it really lacked tinkerability!!
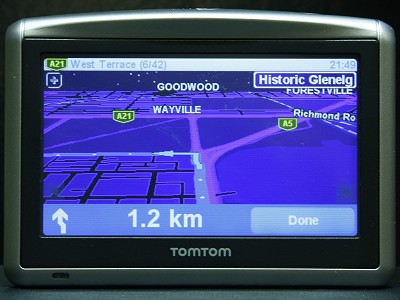
So back it went and in it's place I upgraded to the TomTom One XL giving nearly unlimited flash memory capacity and Internet connectivity via Bluetooth Dial-Up Networking (DUN).
TomTom devices are well supported in the Open Source community with lots of projects out there getting them to do things other than replace your street directory. So here is a new blog dedicated just to tinkering with my TomTom (sounds a bit rude really!!).
Until next time, keep on tinkering! ...Robert
(Page 1 of 1, totaling 5 entries)