Getting back to my original idea of Raspberry Pi powering my coffee machine I started reverse engineering the sensors in investigating the required inputs and outputs.
This image shows the main control board removed from its normal location and placed connected with inputs and outputs accessible.
One thing I quickly noted was that the entire ELV (Extra Low Voltage) circuit was references to the mains active supply line. This required just a little bit of care in making any measurements.
Measurements with a multimeter are generally not a problem as they are generally very well insulated but I need to use a DSO (Digital Storage Oscilloscope) for some of the measurements and my DSO was an earthed piece of equipment. I could have supplied the coffee machine using an isolation transformer but the heating cycle would overload it. Instead I chose to isolate the DSO and float it to mains active potential for all measurements. In this was I was able to determine the logical levels, thermistor resistor measurements against heating block temperature and the the flow-meter performance.
Flow Meter
The flow meter was found to deliver around 2140 pulses per litre unobstructed and 2368 working in the optimum pressure region. From this I note two points, a) that the flow meter is non linear and more testing will be needed to create an accurate count per litre to flow rate calibration, and b) the existing firmware uses flow-rate information as a proxy for pressure measurement in order to back off on the pump. The flow-meter input drives and interrupt pin on the micro'.
Temperature Metering
The temperature measurement is made using a 100K NTC device mounted on the heating block. Initial testing show the heating block is cycled for input voltages at the micro' of 2.31 (on) ans 2.12 (off) for a supply of 5.2V. From this I will be able to source the thermistor data assuming a block target temperature of 90degC.
Logic
The logic for the control of the pump, heater and discharge solenoid are simple outputs however all other logic comprises 6 multiplexed switch/led combinations where echo IO pin operate the LED and reads the input switch via multiplexing between input and output operations. See BES820XL.pdf for the full schematic details.
Power Supply
This is the first major issue to need an overhaul. The design uses a low cost capacitive supply and from a long experience in this kind of design I can only say that it needed to be replaced with a real supply if it would ever power the Raspberry Pi with WiFi.
I retained the 24VDC supply for the relay (for now), removed R4 and inserted a 5V 1000mA SMPS. That should be more than enough!
Here is the control board back into position for an extended period of trial in this configuration while I consider the next steps.
... Robert
Sunday, October 21. 2012
Raspberry Power To The Coffee Machine
New WiFi Adpater
I needed another Netsys 300N adapter for a different project. When I received it the form factor had changed so I decided to use the new smaller adapter for the 'Pi instead.
Here now with it's new profile is the 'Pi running all on it's own on the kitchen wall ( delivering this webpage! )
... Robert
Here now with it's new profile is the 'Pi running all on it's own on the kitchen wall ( delivering this webpage! )
... Robert
Friday, October 5. 2012
Using the Spyder Express On Multiple Monitors
I have been using my trusted Spyder3 Express in a WindowsXP environment for a few years now to calibrate my monitors and ensure consistent colour and tone rendering between computers. Recently however I upgraded to a new Windows7 dual monitor desktop and officially the Spyder3 Express no longer worked for me.
Looking for help on this issue I kept getting the same message that I need to pay double for the model which does support multiple monitors. The 'Express' is an inexpensive entry level product designed only to support a single monitor.
Rather than being forced to pay for an upmarket product with multiple monitor support I decided to find a work-around. Here is my successful solution providing monitor independent calibration for two monitors, an AOC and a BENQ. I apologize for this rather terse set of instructions. Feel free to ask questions if this does not work for you.
Step 1. - Get your dual monitor desktop configured and working the way you want.
Step 2. - Install the SpyderX Express drivers and software but do not begin any calibration.
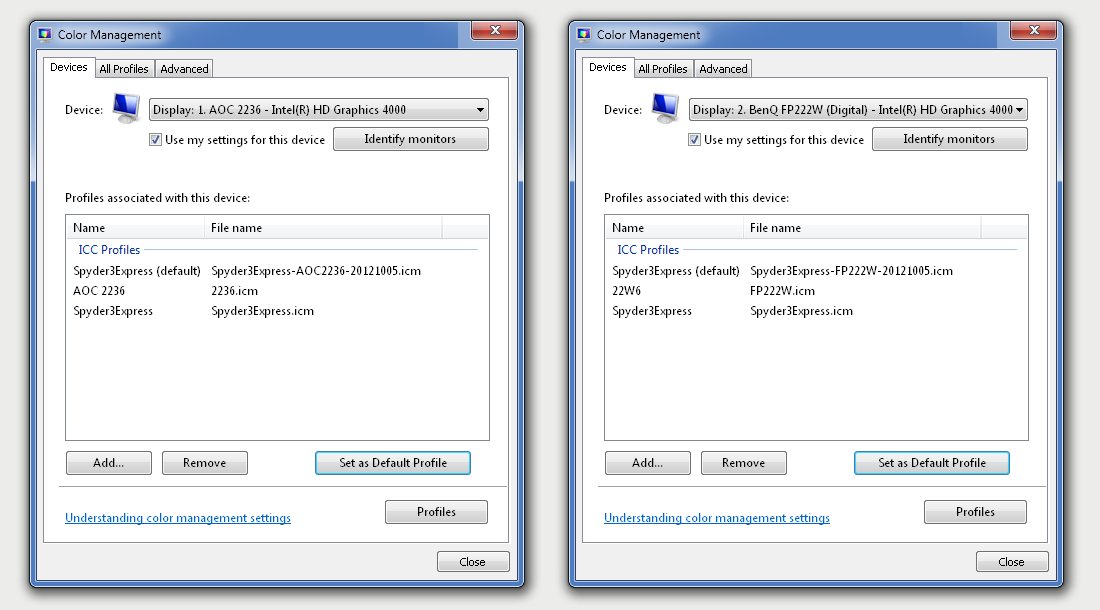
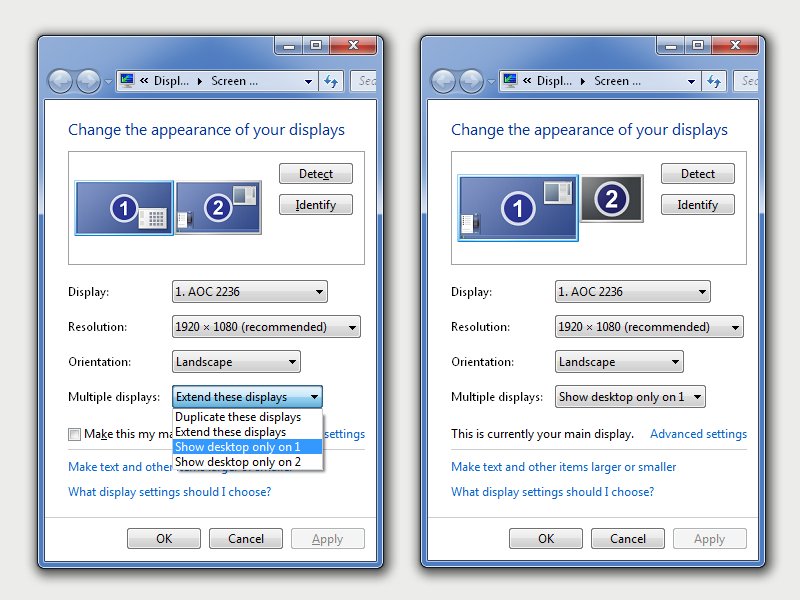
Step 3. - Go into Screen Resolution settings (right click on the desktop) and change the display to only use monitor 1 as shown.
Step 4. - Perform a standard SpyderExpress calibration procedure on the selected monitor and confirm colour has been corrected as expected.
Step 5. - Using file explorer, navigate to the profiles directory 'C:\Windows\System32\spool\drivers\color'.
Step 6. - Locate the newly created file 'Spyder3Express.icm' and make a copy of it in the same directory, in my case 'Spyder3Express-AOC2236-20121005.icm'.
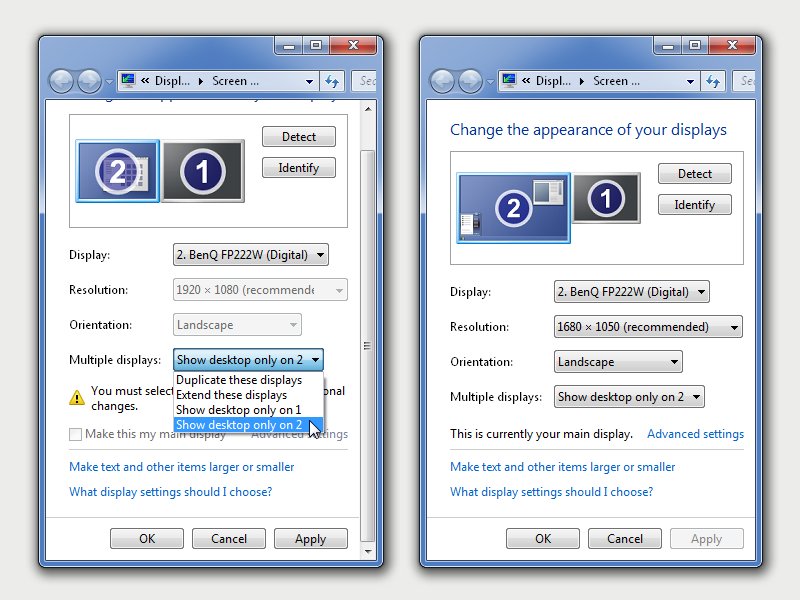
Step 7. - Repeat Steps 3-5 as above but this time select monitor 2 as shown below and calibrate it in the same way.
Step 8. - Locate the new 'Spyder3Express.icm' file for the second monitor and make a copy of it in the same directory, in my case 'Spyder3Express-FP222W-20121005.icm'.
The next part is a little tricky and may be dependent on the menus in your graphics setup.
Step 9. - Go into Screen Resolution settings (right click on the desktop), click on 'Advanced settings', select the 'Color Management' tab and click on the 'Color Management...' option.
Step 10. - Select the 'Device:' monitor 1 and make sure the check box 'Use my settings for this device' is selected.
Step 11. - Click 'Add..' and navigate through the list of profiles to find the profile you created for monitor 1 using the 'File name', not the profile 'Name'.
Step 12. - With the new profile for monitor 1 now in the profiles list, 'Set as Default Profile'.
Step 13. - Repeat Steps 9-12 for monitor 2 and confirm setting are similar to those shown below.
Step 14. - Exit the graphics menus and confirm the new independent calibrations can be enabled and disable using the SpyderExpress system tray tool.
Yes it's a little messy but you really do not need the more expensive multiple monitor version. The 'Express' will do multiples just fine.
... Robert
Wednesday, October 3. 2012
Backing Up The Entire Raspberry Pi
Prior to attempting to run my 'Pi at 1000Mhz I decided it would be a good idea to backup the entire machine.
As it uses a 4GB SD it made sense to use another 4GB card as the backup destination. As it turns out it was simpler than I expected.
I placed a new 4GB SD card in a USB card reader and inserted into on of the 'Pi's USB ports. I then checked to see what device node the 'Pi used for the card. In my case I found the card at '/dev/sda', and that it has not been automatically mounted. In my case it was not automatically mount but other/future version of 'wheezy' may do this so it is important to use the 'mount' command to check this.
The following command line shows how I block copied the entire content on the operating system block device '/dev/mmcblk0' to the unmount SD card at '/dev/sda'.
sudo dd if=/dev/mmcblk0 of=/dev/sda bs=4M
To test I simply placed the new card into the Raspberry Pi and up it came, a perfect clone!
As it turns out, my 'Pi failed to start at 1000Mhz so the effort was well worth it .
... Robert
As it uses a 4GB SD it made sense to use another 4GB card as the backup destination. As it turns out it was simpler than I expected.
I placed a new 4GB SD card in a USB card reader and inserted into on of the 'Pi's USB ports. I then checked to see what device node the 'Pi used for the card. In my case I found the card at '/dev/sda', and that it has not been automatically mounted. In my case it was not automatically mount but other/future version of 'wheezy' may do this so it is important to use the 'mount' command to check this.
The following command line shows how I block copied the entire content on the operating system block device '/dev/mmcblk0' to the unmount SD card at '/dev/sda'.
sudo dd if=/dev/mmcblk0 of=/dev/sda bs=4M
root@raspberrypi:/boot# dd if=/dev/mmcblk0 of=/dev/sda bs=4M
945+1 records in
945+1 records out
3965190144 bytes (4.0 GB) copied, 840.205 s, 4.7 MB/s
To test I simply placed the new card into the Raspberry Pi and up it came, a perfect clone!
As it turns out, my 'Pi failed to start at 1000Mhz so the effort was well worth it .
... Robert
Tuesday, October 2. 2012
Need More RAM
Today I discovered my Pi had gone off-line! No WEB, no SSH. I am not sure what happened but a reboot brought it back to life again.
So while it had my attention I decided a few tweaks were in order.
Tweak 1. More RAM
During general operations I had previously noticed MySQL had grabbed a substantial chunk of virtual memory and on a NAND based system this is not desirable. I am not sure how the memory was being used but seeing I am not using HDMI video I could reconfigure the Pi to use less video memory and give more back to user space applications.
In my case I copied '/boot/arm240_start.elf' to '/start.elf' which immediately gave me back a much needed extra 48M of RAM.
Tweak 2. Bump Up The Speed
I edited the '/boot/config.txt' file to enable CPU overclocking beginning at 800Mhz initially to see how that goes.
I like the raspberry coloured gear graphics I found so I may use this for all general configuration tweaking posts.
... Robert
So while it had my attention I decided a few tweaks were in order.
Tweak 1. More RAM
During general operations I had previously noticed MySQL had grabbed a substantial chunk of virtual memory and on a NAND based system this is not desirable. I am not sure how the memory was being used but seeing I am not using HDMI video I could reconfigure the Pi to use less video memory and give more back to user space applications.
In my case I copied '/boot/arm240_start.elf' to '/start.elf' which immediately gave me back a much needed extra 48M of RAM.
Tweak 2. Bump Up The Speed
I edited the '/boot/config.txt' file to enable CPU overclocking beginning at 800Mhz initially to see how that goes.
#uncomment to overclock the arm. 700 MHz is the default.
arm_freq=800
I like the raspberry coloured gear graphics I found so I may use this for all general configuration tweaking posts.
... Robert
(Page 1 of 1, totaling 5 entries)