Installing the DVI-04 was a breeze with it fitting neatly in place and being fixed to the main CPU heatsink with two metal screws. For the connector you will need to find a suitable standard slot punched metal backpiece as one was not supplied with the kit. I simply cut a large slot in a blank backpiece and ran the cable out the back as a dangling connector.
First up nothing worked and I was not able to see the new DVI monitor in the display setup. I tried changing the BIOS settings to enable CRT+LCD mode but again no success. After some research I discovered that at least BIOS version 2.01 does not work with the DVI-04. Mine was 2.03 but a quick check on the VIA website revealed that 2.50 was available.
BIOS Upgrade Required
Downloaded firmware I1A0D205.ROM (513KB) and AFUDOS.rar (133KB) from the VIA Epia SN product website.
Create a bootable USB drive following instructions at http://www.bootdisk.com/pendrive.htm and install the ROM file and the unarchived AUFDOS.exe flash programming utility onto the bootable USB drive.
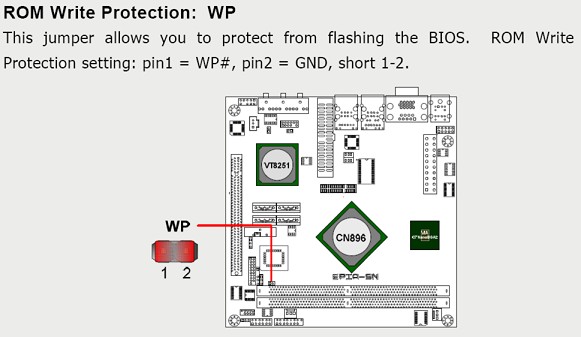
Here's a small little step which had me stumped for a while. Power off the system and remove the BIOS write-protect jumper!

Now power-up the system and press F11 during POST to bring up the boot selection menu and boot from the USB device. If the USB drive does not appear in the boot list you may need to restore the current BIOS configuration to default first or at least ensure that legacy support for USB devices is enabled. Failing that test your bootable USB key on an other system to conform it boots correctly. Failing that you may need to resort to a bootable CD which is also easily made.
Update the BIOS with following command, AFUDOS I1A0D205.ROM /P /B /N /C
During programming you will note that NVRAM is re-written and the checksum is destroyed. This is good!
Remove the USB device and restart the system, ignore CMOS checksum complaint and press F1 to enter BIOS configuration
Load defaults, save & exit.
It's up to you whether or not to re-fit the write protect jumper. I put mine back on again just to be sure.
Credits For This Article
www.via.com.tw for the upgraded BIOS, programming tool and the image used in this document.
http://www.bootdisk.com for information on USB boot.
Seth Purdy (spurdy) at ViaArena for his notes.
Files
AFUDOS.rar - Flash Programming Tool
I1A0D205.ROM - BIOS ROM File 2.50


