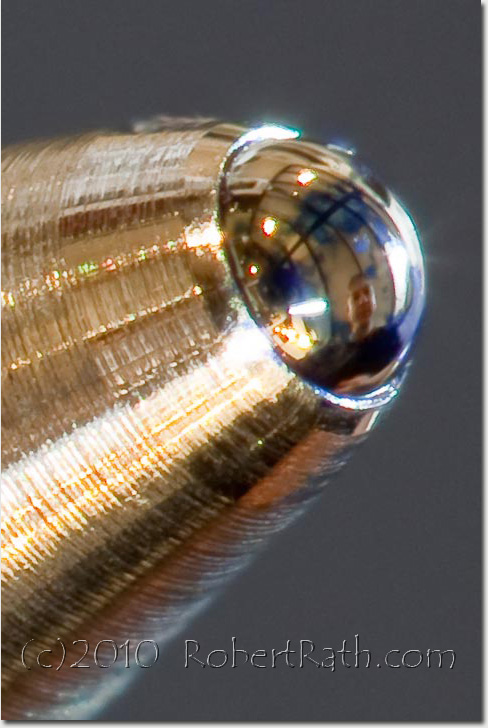
Have a close look at this image and you will clearly see a reflection of myself in the shiny surface of the 'thing' I have photographed but what are you looking at a photograph of? Believe it or not, that reflection is coming from the ball of an ordinary ball point pen. Welcome to the world of macro photography!
I love the way macro brings a world to life around us that we are normally oblivious to as we go about our lives. Just a few minutes in the kitchen will reveal an infinite variety of amazing perspectives if we can get small enough to perceive them or make them large enough to have an impact. The second of these two strategies via macro photography is clearly the easier task unless you are in possession of a shrinking ray gun.
So how macro is macro?
The standard definition of a macro image comes from film camera days where an image 10mm high translated directly to an image 10mm high on a 35mm negative or slide. This 1:1 image ratio or smaller was deemed to be 'macro' while larger than this was simply 'close-up'. Today we use the term a little more loosely as many camera manufacturers proclaim their cameras are macro capable but very few achieve true 1:1 macro. This is further complicated as image sensors in nearly all cameras (with a few exceptions) have a much smaller image sensor than the original 35mm slide or negative.
So what are your options if you want to bring the very small into focus (pun intended :-)?
A. Purchase a compact digital camera with a very good macro mode.
Many compact cameras are able to focus very close to a subject when placed in 'macro' mode. Even if true 1:1 macro is not possible the results in good light can be excellent. The key with these cameras is their ability to get very close to the object they are taking a photograph of. This is fine when there is lots of natural light but often this is not the case. Often the image is so close to the lens of the camera that light from the flash will be shadowed by the lens and it will not be possible to sufficiently light the subject. Some cameras, notably the Olympus 5060 and 7070, disable the flash in macro mode for this very reason. In most cases however good results can be obtained by using the camera with a tripod and timer and allowing the camera to do a long time exposure in order to get sufficient light.
B. Purchase a DSLR camera with a dedicated macro lens.
This is the best solution if you can afford the hardware and don't mind managing the bulk of large cameras and lenses. Dedicated macro lenses combine the qualities of a telephoto lens with close focus. This provides good magnification of 1:1 or better without having to get too close to the subject. Lots of light is available from in built flash or external strobes and taking good macro images in the realm of 1:2 through to 5:1 is relatively easy depending on the lens. It is worth noting that auto-focus becomes more challenging for the camera at macro ratios greater than 1:1. Lenses designed for macro ratios greater then 1:1 will almost always need to be manually focused even if they are auto focus capable.
C. Use extension rings or diopters with a standard lens and a DSLR camera.
The use of extension rings or diopters creates apparent magnification by allowing a standard lens to focus more closely and hence achieve greater magnification. This is a commonly used by those who already own a DSLR camera and want to dabble in macro imaging. The issues with macro rings are very similar to those experienced by compact camera users, namely the close proximity of the object to the lens and difficulty in both lighting the subject and also in achieving acceptable depth of field. In some cases compact cameras will do better due to their smaller image sensor and associated better depth of field. An image sensor in a compact camera which is only 25% the size of that in a DSLR camera can take the same image at 1:2 image-to-sensor ratio while the DSLR struggles at 1:1.
Depth-of-field Issues
Any time a lens is placed close to a subject it requires a smaller and smaller aperture to achieve acceptable depth of field. For large apertures it is not uncommon to be struggling with a focal plan less than 1mm in depth where anything outside of this 1mm good zone becomes progressively unfocussed. Stopping down the lens to f8, f16 or even f32 widens the depth but at a huge cost to available light and the absolute dependence on strong strobe lighting or very long time exposures. The higher in magnification you go these problems become exponentially worse to the point that 10:1 is really the limit without going to dedicated microscope hardware.
To wrap up I would suggest making a start into the world of macro photography with a good digital compact, a sturdy tripod and an equally good deal of patience. The results from compact cameras can be quite stunning and now with the higher megapixel counts available you have a lot of scope for cropping to achieve even greater apparent magnification. If you already have a DSLR camera I would really suggest aiming to purchase a dedicated macro lens. Extension tubes with standard lenses will always present frustrating problems with low light and poor depth of field although good results can still be achieved with patience.
Until the next post, drink the potion or nibble the cake and see where the rabbit hole leads! ...Robert

Photo: Robert Rath: Self Portrait In A Ball Point Pen


